How I Made A Ray Tracer
Intro

Starting this year, I decided to dedicate some of my spare time to a few personal projects I never got around to actually doing due to various circumstances.
The goal of this particular project is to be able to create a simple ray tracer software tool that will be able to produce some cool images.
Ray tracing is a technique used to generate a two-dimensional image from a tri-dimensional model, and a ray tracer is a piece of software that performs ray-tracing calculations.
Ray tracing as a whole is getting more and more popular these days, as consumer graphics cards have gained the ability to do real-time ray tracing to increase image quality.
I’m going to present to you the process that brought me from zero to creating a ray tracer completely from scratch.
Personal Projects
The idea for this project actually came to me last year.
I was talking to a friend who at that time was making a PS1 emulator . We were talking about cool stuff like implementing a graphical pipeline in software (basically rendering an image without asking for any help from the GPU ).
That discussion reminded me of the time I made a ray tracer back in the day (I bet it’s still on my old iMac G4 hard drive). I remember it was pretty crazy but I never got around to experimenting more with it.
Wouldn’t it be cool, I thought, to make another ray tracer as a personal project?
I went on and started coding on a whim. Unfortunately, I was busy with other matters so I had to stop working on the project after a few commits.
Almost a whole year passed and the project was still lingering on my GitHub account with only a few commits to it, so I decided to give it another chance.
This time, I’m going to proceed in a more structured fashion. I find that I’m more likely to abandon a project if I jump into it without planning first.
Also, to make this a more effective learning experience, I’m going to tackle this project by thoroughly studying and understanding the theory underlying ray tracing.
I’m reserving four months (from June to September) to bring the project to a conclusion. Four months should be plenty of time to explore the subject while still short enough to avoid procrastinating.
Before Starting Out
There are tons of tutorials and books out there on how to build a ray tracer, but in the past, I sometimes tried using resources like those paint by numbers-style books because they usually skip explaining the math and go straight to the code. However, if you don’t understand what makes the ray tracer tick, you’re basically just copy-pasting the code without fully grasping it. I could have used those as a reference, but since I already wrote a ray tracer a couple of years ago, I wanted to go more in-depth this time.
I would start from the math behind it.
I remember studying linear algebra when I was first starting out in computer graphics (mainly OpenGL fixed-function pipeline ) ages ago, so naturally, I thought that was a good starting point. I just needed to give myself a good refresher on the subject.
Searching online, I found this awesome free textbook called – yes, you guessed it – Linear Algebra by Jim Hefferon , Professor of Mathematics at Saint Michael’s College . The textbook is free to download. Also available on the website is the LaTeX source, solutions to all the exercises, classroom slides, and a series of video lectures.
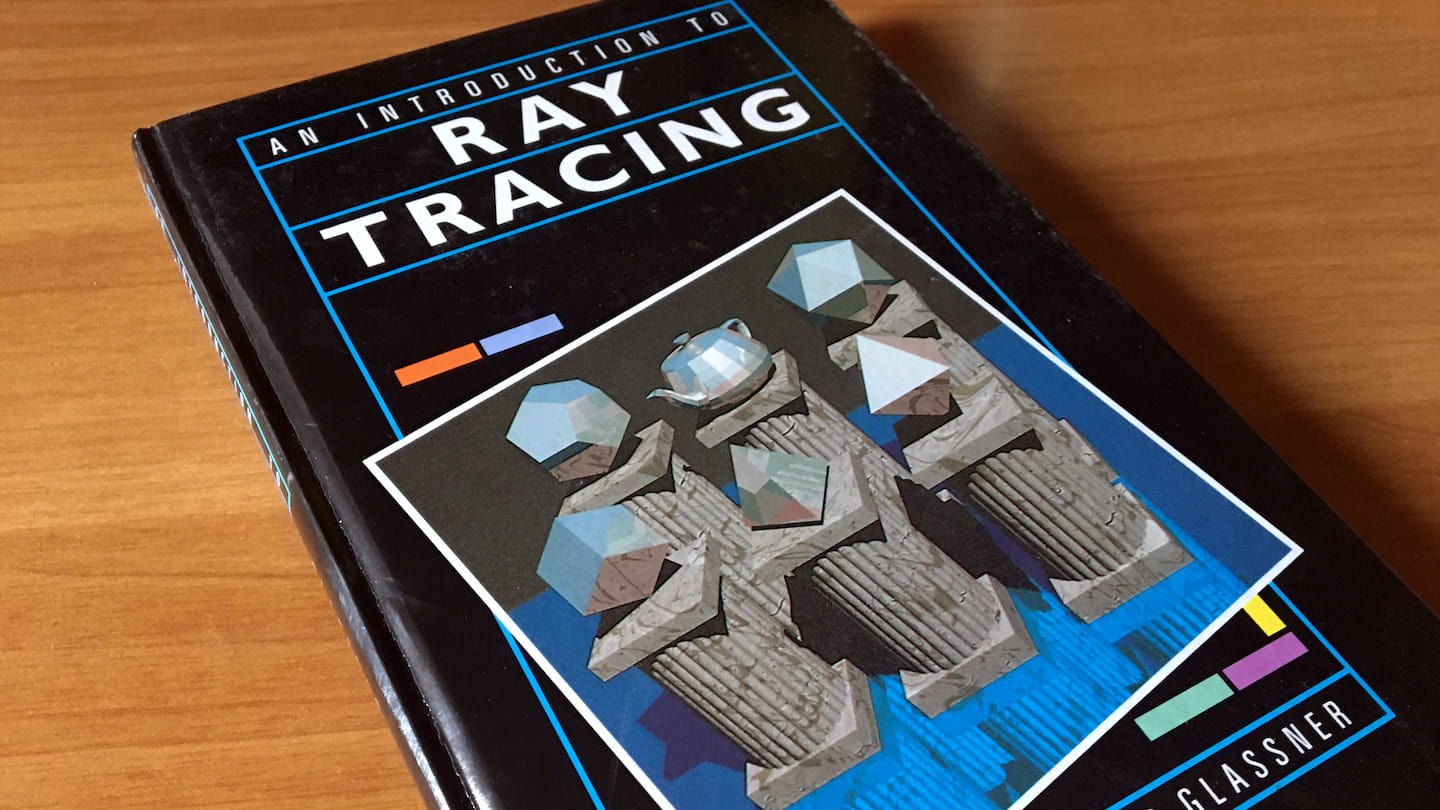
The second book I used is called An Introduction to Ray Tracing . It’s a classic book on the subject and while a lot of the techniques contained in it are kinda outdated, they’re still fundamental to understand the basics of ray tracing. I bought this book in physical form ages ago and I remember it was really easy to follow and understand. This book is likewise available for free .
The Application
For learning projects like this, I’m always keen to make something that will be able to run in a web browser instead of a native application – the reason being that if the project runs in the browser, there’s less friction when I want to share or show it to somebody like a prospective employer.
Unless a side-project requires a specific feature that only a native app can have access to, I always try to settle for a web app. The only problem is that any modern web project usually requires you to use JavaScript and the Node.js ecosystem. While I don’t mind Node, I’m not the biggest fan of JavaScript. Don’t get me wrong, it’s a fine programming language, but I’m personally more productive using languages that support static type checking .
And here’s where TypeScript comes to the rescue! TypeScript is a programming language that transpiles to JavaScript. TypeScript was developed to get around JavaScript’s shortcomings by adding support for optional static typing, which is why I chose it for this project.
Studying Linear Algebra
Linear algebra is a broad subject.
I ended up studying the whole book, learning a lot of interesting topics that I would have never come across if I was only looking up at the math needed for ray tracing. The book also presents some linear algebra real-world applications at the end of every chapter. It really helps ground what you’re studying into reality.
Overall, I really enjoyed this book. Working out proofs and exercises was more fun than I remembered from back in school.
Studying An Introduction to Ray Tracing
I started studying An Introduction to Ray Tracing immediately after I finished Linear Algebra.
The book opens with a comprehensive introduction to ray tracing.
Various illustrations accompany the introduction to help the reader visualize the process. Ray tracing is a visual matter, so having it explained in both text and visual form is great. I found myself relying more on those rather than the written explanations.
After the introduction, we enter one of the most important chapters of the book. Appropriately titled Essential Ray Tracing Algorithms, the chapter discuss the fundamental operation of calculating where our rays will intersect with the objects of our scenes, which, if you think about it, is what classic ray tracing is all about.
Taking Notes
I did all my writing on paper.
Writing on paper really helps me concentrate. There’s just less friction that way. With the computer, the next distraction is always only a new tab away. I also feel that when I write stuff down on paper, I have an easier time recalling information later.
I remember reading some research that showed that writing by hand helps people remember better and learn more efficiently. The brain supposedly gets more stimulated and less distracted when writing with a pen/pencil rather than just typing on a keyboard. This helps to form long-term memory.
I also find that I tend to review my paper notes more over digital ones. Having something physical on your desk always there reminding you of your progress is better than having something in some text file that you write once and then forget about. I know this because, over the years, I’ve accumulated tons of now-forgotten memos all over the place, spanning a multitude of devices and cloud services.
Reviewing What I’ve Learned
As I was finishing each chapter, I wrote down all the interesting explanations and definitions on flashcards. I know that flashcards and SRS are a controversial topic in the learning community, but I’ve been using those tools for a long time now and they’ve always served me well. Yes, creating and reviewing the cards is extremely time-consuming, but I think it’s worth the time investment. I find it especially helpful for memorizing definitions.
Repetition is key to make something stick.
Repetition is a simple way to keep knowledge fresh. Spaced repetition software uses repetition to help you review your cards. The more you get a card’s answer right, the less frequently the card is shown.
Anki is my SRS of choice. I’ve been using it for a long time now and have accumulated quite a few flashcards on my Anki account. The software is quite straightforward to use. For example, I have cards that ask me to demonstrate a theorem. After I finish my answer (which I write rigorously by hand because, as I said before, doing so helps me jog my memory), I compare my answer against the one written on the back of the card. Then it’s time to rate my answer. I can choose between Easy, Good, or Again depending on how difficult answering the card was. When you select Again, Anki will flag your answer as incorrect and show you those cards more frequently to help you memorize them.
The Ray Tracing Algorithm
This is the heart of any ray tracer – the sweet intersection between math and code that makes everything tick.
When people explain ray tracing, they usually make an analogy about how real-world cameras work.
Rays of light from the environment enter the camera from the lens and hit the sensor (or a piece of film in the case of an analog one) in the back of the camera. The sensor then captures the color of the light and the camera produces the final image file.
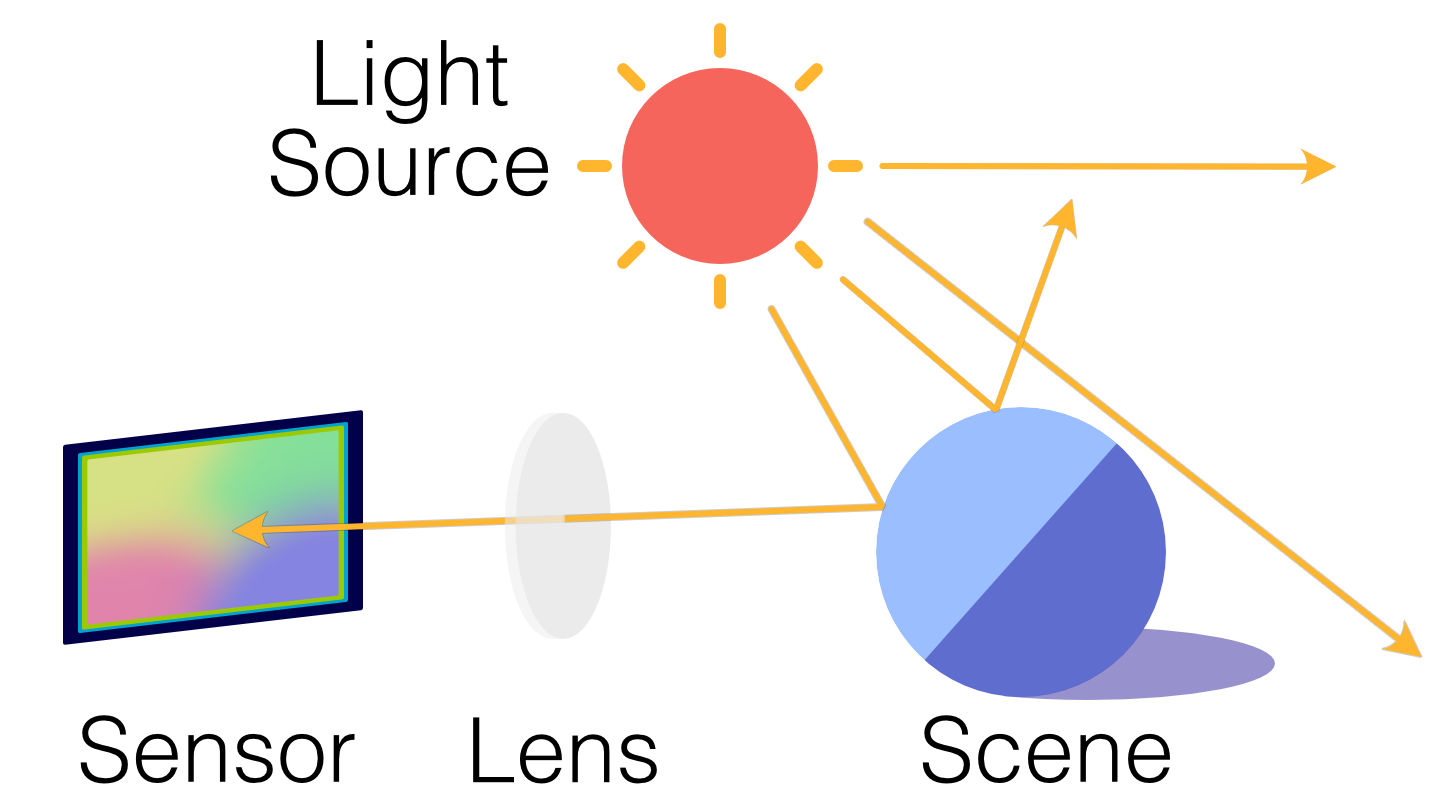
Ray tracing works almost the same way as a real-life camera, only instead of a sensor, we have an image plane .
The image plane of a ray tracer works a lot like the sensor of a camera. Basically, ray tracers create images by determining what color to fill each pixel on the image plane. For example, if there’s a blue sphere in the center of the scene, the corresponding pixel on the image plane will also be colored blue.
But how will the ray tracer know what color to fill in those pixels? After all, there’s no real light in our 3D scene – it’s just a bunch of data. Here’s where the ingenious intuition of ray tracing comes into play. We can use the same principle that makes a real-world camera work and simulate the rays of lights.
We start by generating a ray from the point of view (also called eye or camera) to the center of each pixel of the image plane.
Rays may or may not intersect objects from the scene. If they do, we just need to color our pixels based on the intersected objects. For example, if the ray intersects a red cube, you can consider that pixel to be colored red in the final image.
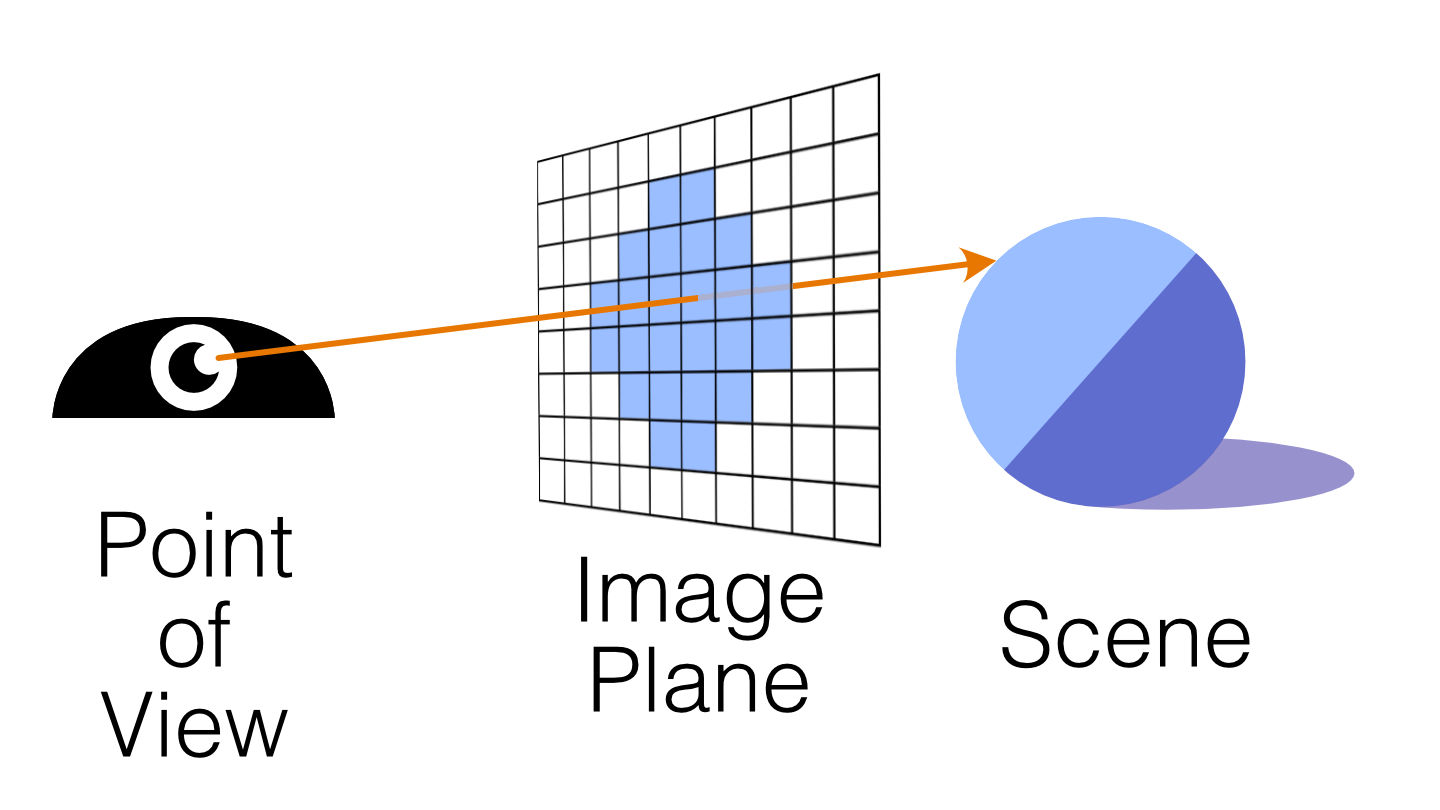
It’s just like a real camera would work, except that the image plane is placed in front of the point of view while the camera’s sensor or film is behind the lens.
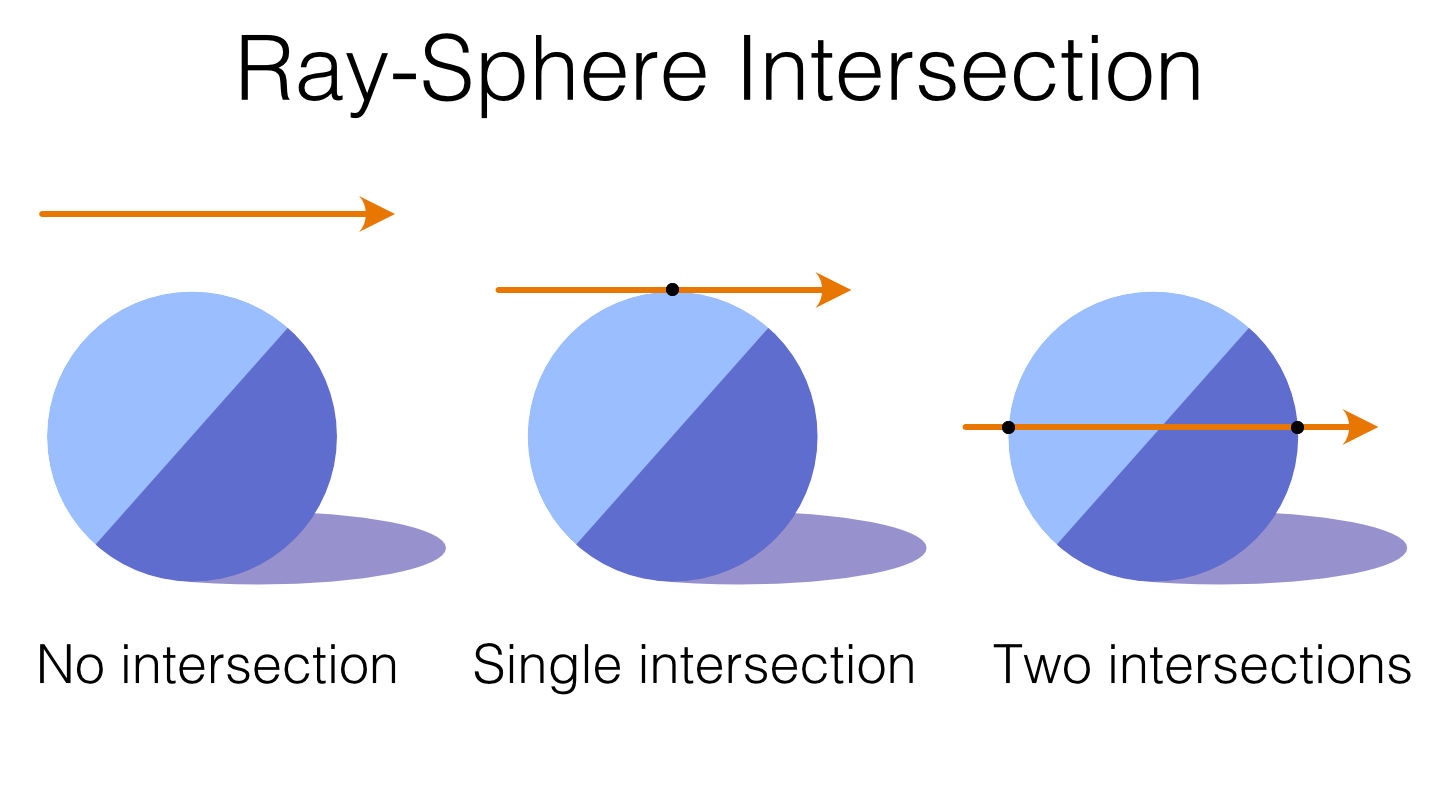
To do so, we need an algorithm to detect if and where our rays will intersect with any object placed in our 3D scene.
There are many ray-object intersection algorithms depending on what kind of geometric primitives (spheres, planes, triangles, etc.) we’re testing on. Different algorithms have different degrees of efficiency and sophistication.
One of the easier ones to understand and implement is the ray-sphere intersection algorithm (this is why a lot of pictures produced with ray tracers have spheres on them).
However, there’s so much more we can do with our ray tracer other than just shading each pixel with the local color of the objects from the scene.
For example, we can render shadows. These contribute a great deal to making computer-generated images more believable, since shadows provide a strong visual cue for the shape of an object.
Once we have our intersection algorithms set up, calculating where shadows lie is simple. We already have the point on the surface where the ray hits the sphere, right? From that point, we can trace another ray (sometimes called a shadow ray or illumination ray) toward the light source. If this shadow ray hits an object along the way before reaching the light source, we can conclude that this object would block the light, thereby casting a shadow on the point from which the shadow ray is generated.
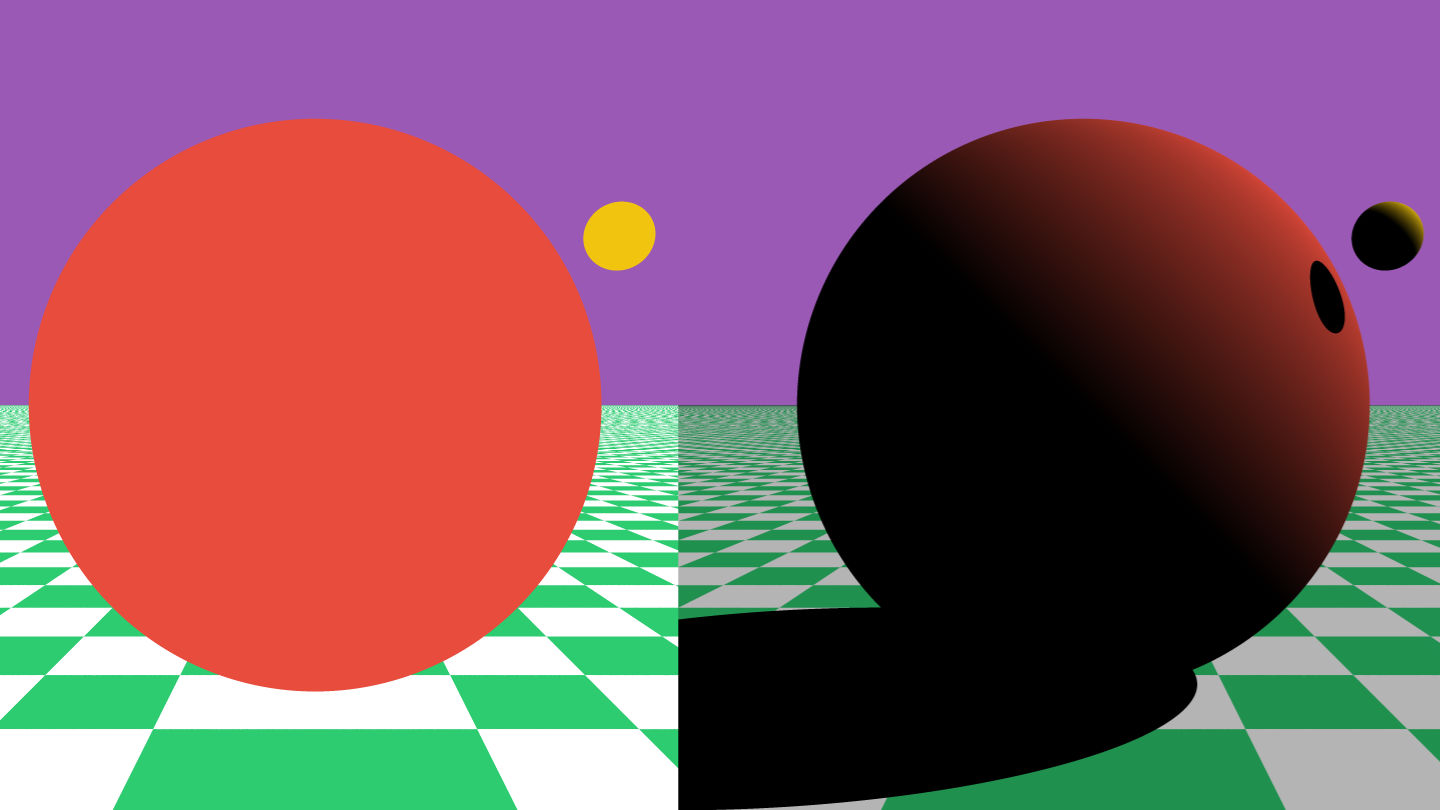
Now that we have shadows, wouldn’t be nice to have a nice flat plane to casting shadows onto? This is why I also implemented plane-ray intersection testing in my ray tracer.
Since the plane looked really flat, I also added a checkerboard texture to it. It looks like a regular texture once it’s rendered, but it’s generated procedurally using the UV coordinates of the plane as a reference.
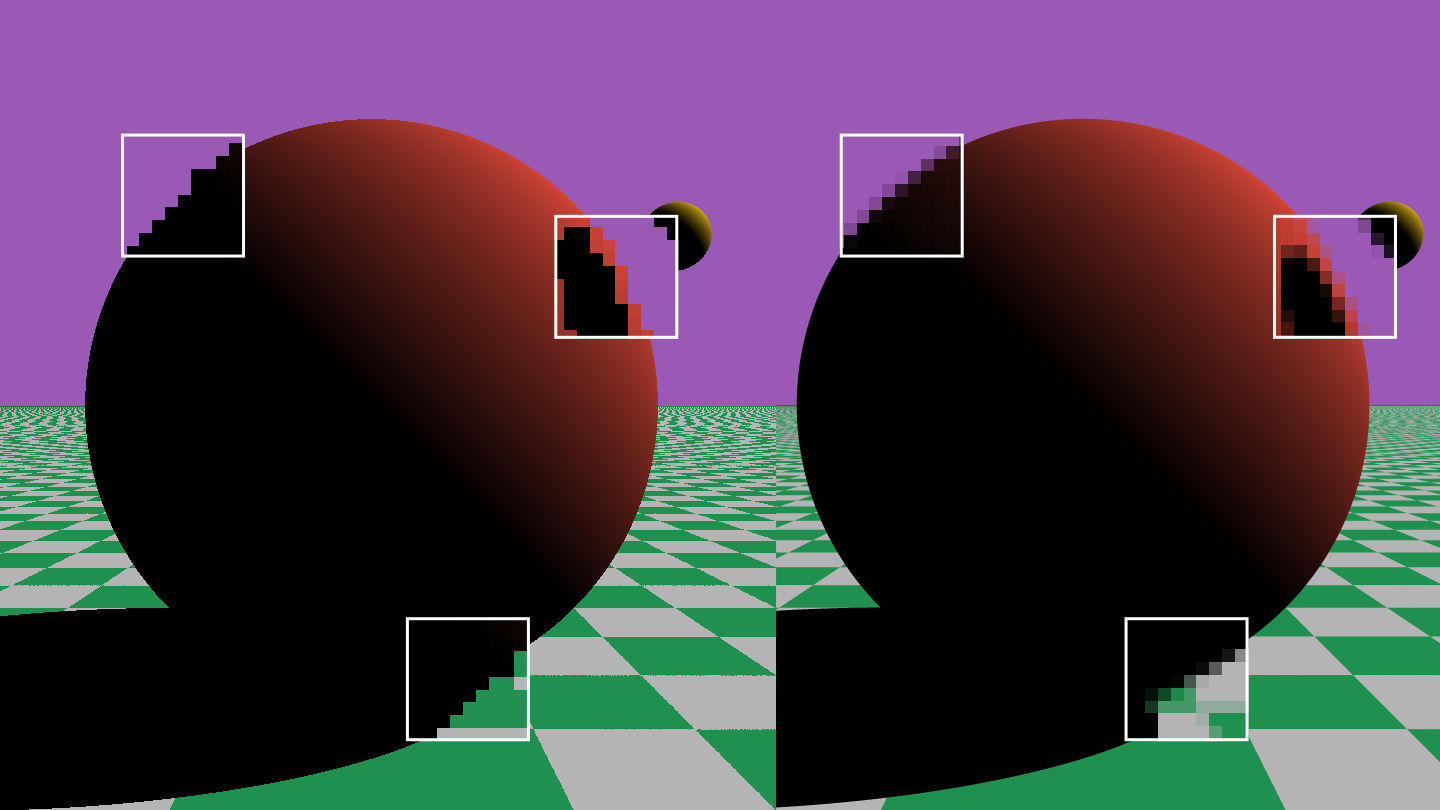
Last but not least, I added anti-aliasing , also known as AA, to make everything look a little smoother.
The Development Environment
Setting up the development environment for this project was pretty painless thanks to using a combination of Visual Studio Code , npm , and webpack . Live reloading made writing and testing the application a breeze.
For this project, I coded both the ray tracing algorithm and vector math library from scratch. I wrote test units to cover every possible edge case. This was especially useful while refactoring code, when I had to make sure that the application would work as intended after the changes. I used Jest as my testing framework. I love its simplicity! It just works!
I usually use Travis CI (or CircleCI ) as CI/CD for my projects, since both have free plans for open source projects, but this time I went with GitHub Actions . It was my first time using the service, but everything went smoothly without any major problems.
Once built and tested, the whole project gets deployed automatically to GitHub Pages and is immediately available to use.
Possible Future Improvements
A list of features I’d love to add to my ray tracer if I ever get the chance to work on it again:
Scene editor
I wish I had added a simple way to manipulate the scene – for now, it’s hardcoded in the source code.Specular Highlights
The bright spot of light that you see on shiny surfaces when illuminated.Reflections
The light bouncing off the surface for rendering reflective materials like mirrors or bodies of water.Refractions
The light bending while passing through an object. This is the phenomena responsible for effects like when you put a straw in a cup of water and the straw appears bent.Textures
Implementing texture mapping, plus maybe support for normal maps so we can render those sweet details.Skybox
Skybox with a cube map so we can make the scene more lively and have nice reflections on glossy materials.Colored lights
Because pure white light feels too artificial, especially if the scene is supposed to be outdoors.Acceleration structures
Like bounding volumes and hierarchies , so the ray tracer can stay performant even when the scene complexity increases.More primitives
Add the ability of rendering primitives other than spheres and planes. Triangles are a popular choice if you want to render something exported from a 3D modeling software like Maya or Blender .
Closing Thoughts
This was a great subject to learn. I’d like to continue this format of doing a side-project every four months. I’m glad I took my time and completed this project, as it was an incredible learning experience encompassing both math and software engineering. I’d love to continue working on expanding the capabilities of my ray tracer soon.
You can play with the ray tracer here and get the source code here .
Related Articles
 Starting out with Godot
 “The Science Behind Pixar” Exhibition in Roppongi Hills